How To Easily Setup WiFi Hotspot in Windows 7 Using CMD
Did you ever think that you could use you personal computer as a WiFi Hotspot? If not, then today in this article, we'll setup a WiFi Hotspot in Windows 7 without any third party software. Firstly, you must know that how it will help you.
If you use smartphones, then you might already be aware of this fact that the ability of phones to catch signals is lesser than that of Laptops. Take my example, one day I was surfing internet on my phone but WiFi signal strength was very weak. My modem was placed in the corner of the house, therefore I was facing this problem. I turned my laptop into WiFi Hotspot, connected my phone with that and enjoyed. So, what are we waiting for? Let's get on to our tutorial.

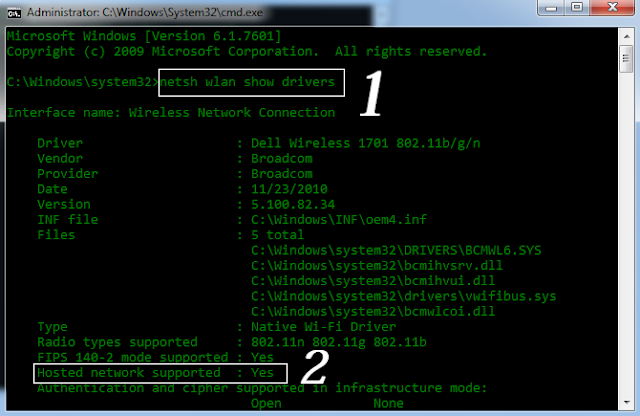
In the above screen shot, Point 1 is indicating the command that we've just entered to check drivers and the point 2 is showing that my Laptop supports Hospot.


If you use smartphones, then you might already be aware of this fact that the ability of phones to catch signals is lesser than that of Laptops. Take my example, one day I was surfing internet on my phone but WiFi signal strength was very weak. My modem was placed in the corner of the house, therefore I was facing this problem. I turned my laptop into WiFi Hotspot, connected my phone with that and enjoyed. So, what are we waiting for? Let's get on to our tutorial.
Creating WiFi Hotspot in Windows 7 & 8
- Turn On Your Laptop or PC, go to start menu and search for CMD, right click on it and then select "Run as Administrator". We have to write some commands here one by one.
- First command that you have to enter, checks that does your computer support hosted network. Enter the following yellow-highlighted in CMD and press Enter key.
netsh wlan show drivers

- After checking the availability, it's time to start hostspot, which is our main topic of this post. Enter the following command in CMD
netsh wlan set hostednetwork mode=allow ssid=CodersMag key=WeAreCoders911
- Replace CodersMag with your desired name of your hotspot and replace WeAreCoders911 with the password which you want to set. (Note: The password is case sensitive.)
- Press Enter.

Your Hosted network has been created. Enter the last command which will start the hotspot network.
netsh wlan start hostednetwork

- OK, half tutorial is completed but you still have to share your internet connection over the created hotspot.
Sharing Our Virtual WiFi Hotspot
- Go to Control Panel>>Network And Sharing Center
- Click on Change Adapter Settings.

- Right click on Wireless Network Connection and select Properties from the drop down list.

- Navigate to Sharing Tab.
- Tick both boxes and select Microsoft Virtual WiFi Miniport Adapter (Mine is: Wireless Network Connection 2) from the drop down menu.
- Click on OK button
- You've done!

So, it was a short, easy and useful tutorial and I hope, you will find it useful for you. Now, let your friends know about it and share it with them on Social Media site or if you have any question or you want to share something with us, then don't forget yo use our comments section. We feel great on replying our commentators.


No comments: